
Interested in publishing content in Posts as “public” or “private” content? Or emailing your Posts with documents as attachments?
Download a PDF version of this article here - backstitch Publishing Public and Private Posts
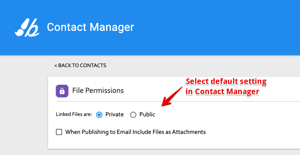
Setting Default File Permissions
Step #1: Locate File Permissions Settings
- In backstitch Studio, click the Contact Manager section under the dropdown menu in the upper right corner.
- Once in Contact Manager, select [Settings]
- Locate the File Permissions section. From here, you can establish the default settings for publishing Posts!
Step #2: Determine the Default Permissions Settings
- Let’s go over the difference between Public and Private Permissions settings:
-
- Private: This option only allows users that have access to your App to view the files.
- If they are opening the file from a Device that is not logged into your App: they are taken to a login screen. Once they have logged in, the fi
 le downloads and is available for viewing.
 - If they are opening the file from a Device that is currently logged into the App: no further action is required. The file is available for downloading and viewing immediately.
- If they are opening the file from a Device that is not logged into your App: they are taken to a login screen. Once they have logged in, the fi
- Public: This option allows anyone to view the file via the link in an email or Post. No login is required. This is a perfect option for newsletters, general information, and upcoming events that users can share with others!
- Private: This option only allows users that have access to your App to view the files.
2. Select preferences for Private or Public file permissions.
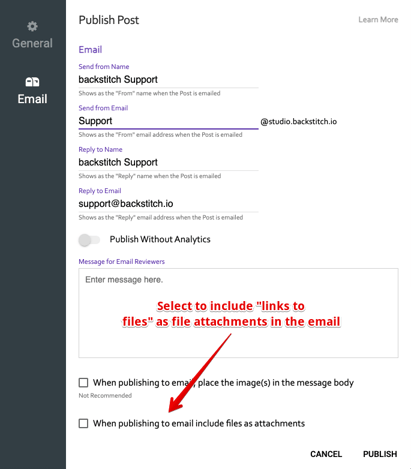
3. Optional: Check the option “When Publishing to Email Include Files as Attachments” for email attachments. Documents included in the Post as links within the web App are included as attachments in the published email.
-
- If this option is checked, the files are available in a hyperlink or as a PDF download (not both). Attachments are never private and can be opened by any recipient who received the email.
- If this option is not checked, the files are available via a hyperlink displayed in the Post. Private and public settings apply.
4. Your default settings for File Permissions for publishing Posts is now set!
Setting File Permissions when Publishing Individual Posts
Step #1: Publish the Post
- After you have created your Post, you can begin the Publishing process by
selecting the orange [Publish] arrow in the lower right corner. - Select [Publish To]
- From here, you can choose how to Publish your Post! Once you have determined the
recipients, [Close] the Publish window.
- Select the purple [Publish] arrow.
Step #2: Determine the File Permissions for this Individual Post
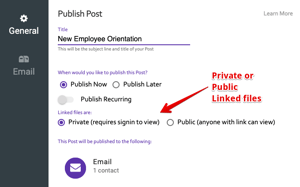
- On the Publish Post screen, view the default File Permissions settings.
- You can alter the settings for this individual Post by clicking the settings you would like to have.
Note: This change is only effective for Publishing the Post this one time. If you republish the same Post, it will revert back to the default settings.